

For those of you who opened up my old website link, you can clearly see that this website is exceedingly different from this website. The main reason for that was that almost everything in my original website was made, edited and update using Visual Code Studio, by me and my current early day coding skills.
Here I will outline the architecture as to how I went about creating the website, providing what details where I can.
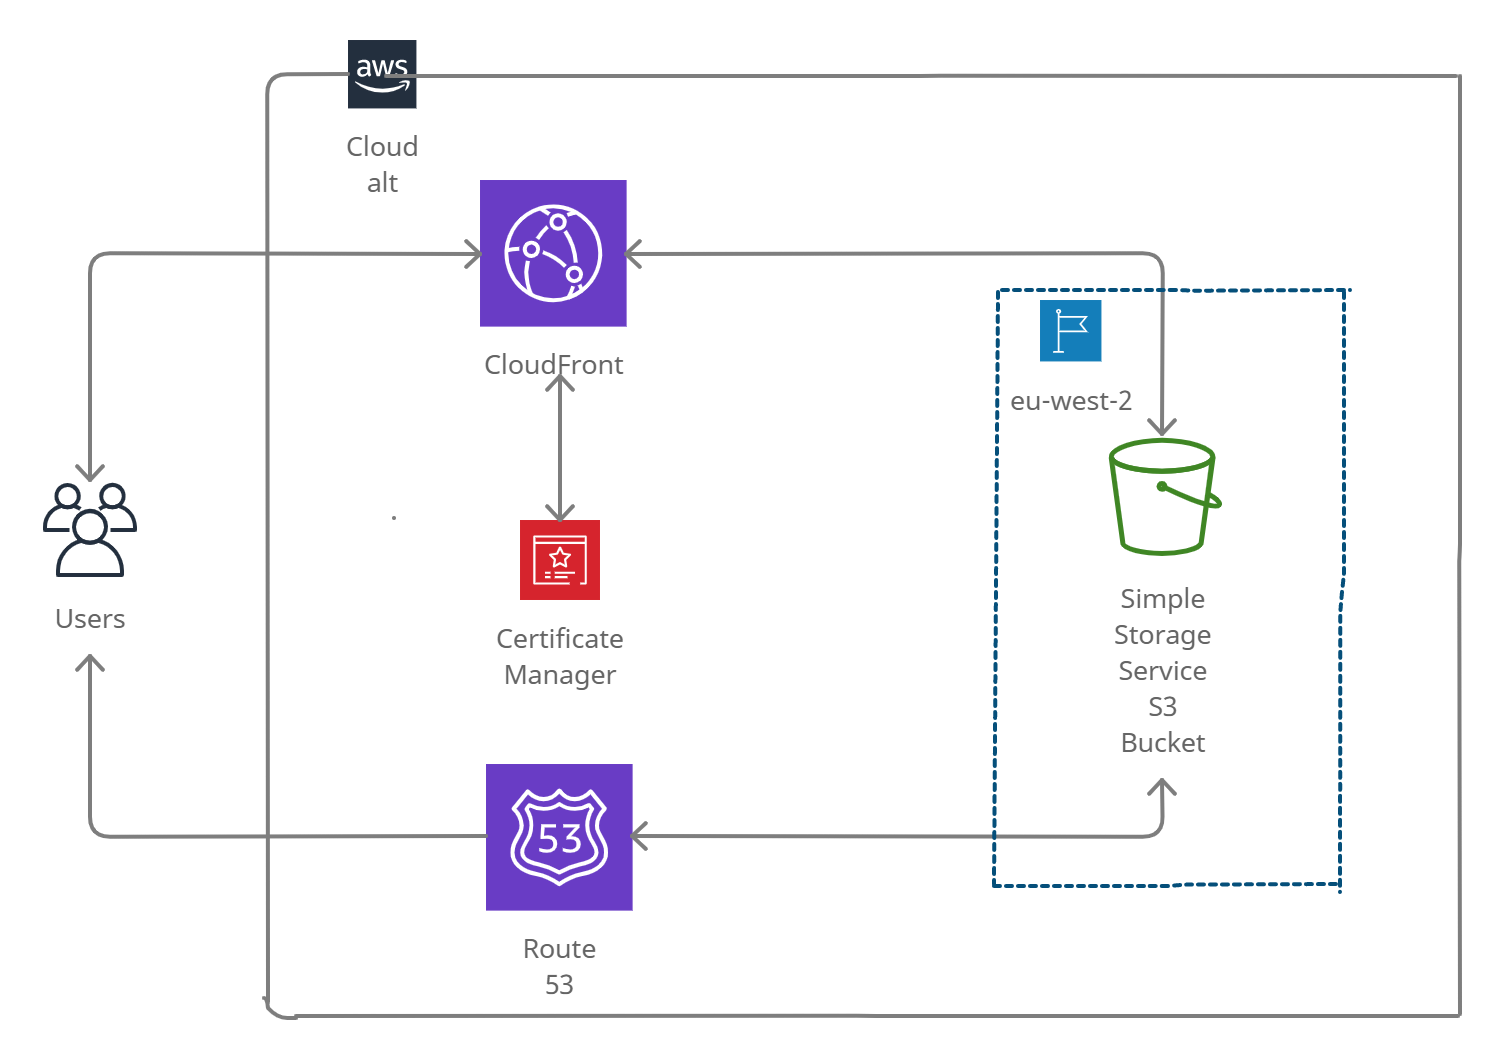
Services used:
S3 static website hosting, Cloudfront, Route53
Going into the exact detail of absolutely everything I did to make this website would take an entire day, so as to not bog you down with all the nitty gritty in here, I have provided a couple of the links to the relevant AWS website documentation on how to execute these. These go into the great that I learned and followed to launch them.
The first thing I did was to register a custom domain name - which you can do on the AWS DNS service, Route53.
I then created two buckets, one being the domain bucket (moonlightlion.co.uk), and the other being the subdomain bucket (www.moonlightlion.co.uk).
The reason who this is that the domain bucket is where you host your content, and the subdomain bucket is used to redirect any searches for the "www.moonlightlion.co.uk" to the registered domain name.
Once the buckets were created, I went to the properties tab of the domain bucket and scrolled to the bottom where I enabled the 'Static website hosting' option and selected the 'Host a static website' hosting type. In the 'index document' I entered 'homepage.html' which is what I intended to save my homepage file as.
After opening the "Block public access" in the permissions tab, I unchecked the "Block all public access" and saved the change. Scrolling down to "Bucket Policy", I selected edit and then applied the following policy and saved;
{
"Version": "2012-10-17",
"Statement": [
{
"Sid": "PublicReadGetObject",
"Effect": "Allow",
"Principal": "*",
"Action": "s3:GetObject",
"Resource": "arn:aws:s3:::moonlightlion.co.uk/*"
}
]
}
It was at this point that I got started on the actual content of the site. Using a CV html template and code, provided by another AWS Academy student-turned-trainer*, I started amending and changing it to reflect how I wanted my CV to look. This was done via Visual Code Studio, utilising the 'live server' extention, enabling me to see how changes looked in real time.
The template he provided was solely for the CV, and as such I created HTML templates of my own for the homepage, the 'About me' and the 'How did I make that' page on microsoft word, however each was edited on Visual Studio Code. It was my intention to update, edit and amend my website solely through VSC so I could further practice what learning I had done thus far on various code languages. I tinkered and tailored daily ultimately ending up with what you see on the 'My old/original website'. I had planned to exclusively use VSC until I'd mastered all the various involved coding, however I felt I'd be better served using an established HTML template for this site, enabling me to use my time to architect and update the site accordingly.
Once the contents were created, all the relevant pages/tabs for the site, the images used for backgrounds etc, were all added to the domain bucket, in the format that they'd been referenced in the code.
Alias records were then added to the hosted zone in Route53, for both root domain and subdomain - the criteria for each were that they were A records, in eu-west-2, pointing to an S3 website endpoint, i.e. the S3 bucket.
To enable lower latency for users, I created a Cloudfront distribution with the domain bucket being the 'Origin domain name'. A 'Custom SSL certificate (moonlightlion.co.uk) was selected that covered both domain names, issued by ACM, and 'Home.html' was put down in the 'Default root object'.
Back in Route53, Alias records were then added to the hosted zone, for both root domain and subdomain - the criteria for each were that they were A records, in eu-west-2, with them pointing to towards the CloudFront distribution.